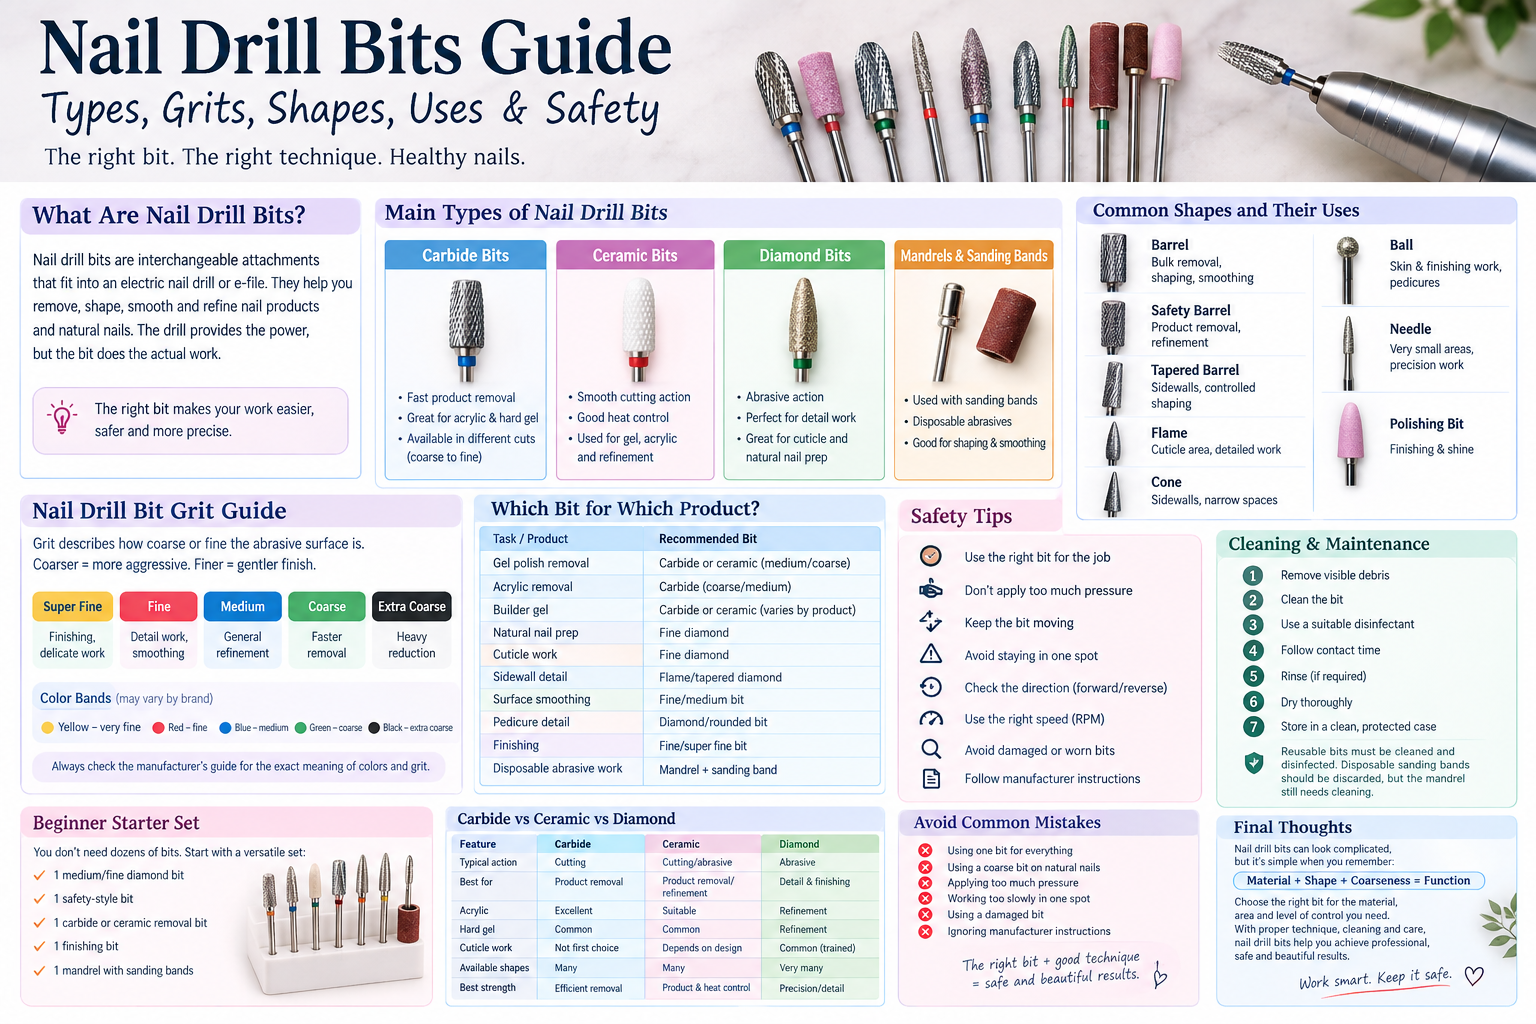
If you have ever looked at a collection of nail drill bits and wondered why there are so many shapes, colors and materials, you are not alone. A barrel bit, flame bit, ball bit, cone bit and needle bit may all look like small metal attachments, but they are designed to do very different jobs.
Choosing a nail drill bit is not simply a matter of picking the one that looks most professional. The right choice depends on what you are working on, how much material needs to be removed, the bit's shape and construction and your level of experience.
A nail drill, also called an efile or electric nail file, supplies the rotation. The drill bit is the part that actually contacts the nail or nail product and determines how the work is performed. Professional guides generally group common bits into materials such as carbide, ceramic, diamond and mandrels used with sanding bands.
This complete nail drill bits guide explains the major types, materials, shapes, grit levels, uses, safety considerations, cleaning, maintenance and the mistakes beginners should avoid.
What Are Nail Drill Bits?
Nail drill bits are interchangeable attachments designed to fit into an electric nail drill or efile handpiece.
Depending on the bit, an efile can be used for tasks such as:-
Removing gel polish or artificial nail product
Reducing acrylic or hard-gel thickness
Refining the shape of an enhancement
Smoothing surfaces
Cleaning specific areas around the nail
Performing detailed preparation
Refining certain areas during a manicure or pedicure
The important point is that the drill itself does not determine the job. the bit, technique, speed, pressure and movement all work together.
A coarse removal bit and a fine finishing bit may be placed into the same machine but they will behave very differently.
That is why learning the different types of nail drill bits is one of the foundations of competent efile work.
Nail Drill Bits vs Nail Drill
It helps to separate these two terms.
A nail drill/efile is the machine containing the motor and handpiece.
A nail drill bit is the removable attachment inserted into the handpiece.
Think of the efile as the power source and the bit as the working tool.
Changing the bit changes the function of the machine.
Why Are There So Many Nail Drill Bit Types?
There are three major things to consider:
Material – what the bit is made from or coated with
Shape – the geometry of the working end
Coarseness or cut – how aggressively it removes or abrades material
There is also a fourth consideration that is often overlooked, “the particular product or surface being worked on”.
For example, a bit suitable for reducing acrylic is not automatically appropriate for working directly on a natural nail.
Current professional guides consistently emphasize matching the bit to the material and task rather than treating one bit as a universal tool.
Main Types of Nail Drill Bits
1. Carbide Nail Drill Bits
Carbide bits are among the most common choices for removing and reducing artificial nail products.
They generally have machined cutting flutes rather than a simple abrasive coating. These flutes allow the bit to remove product efficiently.
Carbide bits are commonly used for:
Acrylic removal
Hard gel reduction
Builder gel reduction
Bulk product removal
Refining artificial enhancements
Shaping enhancements
Carbide bits are particularly useful when there is a substantial amount of artificial product to remove.
Different carbide cuts provide different levels of aggressiveness. A coarse cut removes material more quickly while finer cuts are better suited to refining.
Important carbide bit warning
A powerful carbide bit should not be treated as a general purpose tool for every nail surface.
The closer the work gets to the natural nail, the more important bit selection, pressure, speed and control become.
2. Ceramic Nail Drill Bits
Ceramic bits are another popular option for nail technicians.
They are manufactured from ceramic material and are commonly used for product removal and refinement. Many technicians choose ceramic bits because of their cutting characteristics and heat behavior.
They can be useful for:
Gel product removal
Acrylic reduction
Product refinement
Surface work
Finishing stages
Some professional suppliers specifically promote ceramic bits for their heat management characteristics. However, performance varies according to the exact bit design, speed, pressure and material being removed.
Do not assume that a ceramic bit is automatically safe for every part of the natural nail. The specific manufacturer's instructions and your technique still matter.
3. Diamond Nail Drill Bits
Diamond bits have a working surface coated with diamond particles.
Instead of using large cutting flutes like many carbide bits, diamond bits generally work through abrasion.
They are commonly used for detailed work such as:
Nail preparation
Refining edges
Detailed work around the nail
Cuticle-area work in trained techniques
Smoothing
Certain pedicure applications
Diamond bits are available in numerous shapes and coarseness levels.
Because they are available in very small and precise shapes, they are particularly useful when a technician needs more control over a small area.
4. Mandrels and Sanding Bands
A mandrel is the reusable holder that accepts a sanding band.
The sanding band fits over the mandrel and provides an abrasive surface.
Sanding bands are widely available in different grits and are often used for:
Surface preparation
Product reduction
Smoothing
Shaping
Certain finishing jobs
One major advantage is that sanding bands can be disposable, making them useful where single-use abrasives are preferred for hygiene.
The mandrel itself, however, is reusable and must be handled according to appropriate cleaning and disinfection procedures.
Nail Drill Bit Shapes and Their Uses
Material tells you what the bit is made from. Shape tells you where and how it can work.
Barrel Bits
Barrel bits have a relatively broad cylindrical working area.
They are commonly used for: Reducing bulk, Smoothing product, Shaping enhancements, Refining large surface areas
Because the working surface is relatively broad, barrel bits are useful when working across larger areas.
Safety Barrel Bits
A safety barrel generally has a rounded end instead of a sharp corner.
This design can make certain techniques more forgiving because there is less of a sharp edge at the end of the bit.
They are commonly used for: Product removal, Surface refinement, Smoothing, Shaping enhancements.
The word “safety” does not mean that the bit is incapable of causing injury. It simply describes the geometry of the bit.
Tapered Barrel Bits
A tapered barrel becomes narrower toward one end.
This can provide more access to areas that are difficult to reach with a straight barrel.
Typical uses include: Refining product, Sidewall work, Controlled shaping, Reaching smaller areas.
Flame Bits
Flame shaped bits have a pointed and curved profile.
They are commonly associated with detailed work around the nail and cuticle area.
Their shape allows the technician to reach narrow areas that would be difficult to access with a broad barrel.
Because the tip can be very concentrated, beginners should not assume that a small bit is automatically easier to use.
Cone Bits
Cone bits narrow toward a point.
They may be used for: Detailed shaping, Sidewall areas, Reaching narrow spaces, Specific underside or edge work
The exact use depends on the bit's size, material and manufacturer.
Ball Bits
Ball or sphere shaped bits have a rounded working surface.
They are commonly used for certain detailed skin and finishing techniques, particularly around the nail area and during pedicure services.
Because the entire end is rounded, the working action can be more controlled than with a pointed bit for certain applications.
Needle Bits
Needle bits have a very narrow and pointed profile.
They are specialist tools rather than an obvious choice for beginners.
Their narrow shape can provide access to very small areas but that same characteristic means poor control can create problems quickly.
Polishing Bits
Polishing bits are designed for finishing rather than aggressive product removal.
They may be made from materials such as silicone or other polishing compounds.
They are used when the goal is to refine or polish rather than remove a significant amount of material.
Nail Drill Bit Grit Explained
One of the most confusing subjects for beginners is grit.
Grit describes the relative coarseness of an abrasive surface. In general:
Coarser = more aggressive material removal
Finer = gentler finishing or refinement
However, the terminology is not identical across every type of nail drill bit.
For example, carbide bits are commonly described by their cut pattern or categories such as fine, medium and coarse rather than being treated exactly like sandpaper.
Sanding bands and abrasive surfaces may use numerical grit classifications.
Therefore, do not assume that every manufacturer's color coding or grit number means exactly the same thing.
General Nail Drill Bit Grit Guide
| Coarseness | General purpose |
|---|---|
| Super fine | Finishing and delicate refinement |
| Fine | Detail work and smoothing |
| Medium | General refinement and moderate product work |
| Coarse | Faster product removal |
| Extra coarse | Heavy product reduction for experienced users |
The actual suitable grit depends on the bit material, design and task.
A coarse bit can remove material quickly but that does not mean it should be used simply because it saves time.
What Do the Colored Bands on Nail Drill Bits Mean?
Many nail drill bits have a colored ring around the shank.
The color is often used by manufacturers to indicate the bit's coarseness.
A commonly encountered system uses colors such as: Yellow – very fine , Red – fine, Blue – medium, Green – coarse, Black – extra coarse.
However, color coding should not be treated as a universal law.
Different manufacturers and suppliers may use different systems. Always check the manufacturer's description before assuming that a particular color represents a particular grit.
This is especially important when purchasing bits from different brands.
Nail Drill Bits Chart, Which Bit Should You Use?
Here is a practical starting point:
| Task | Common bit choice | General characteristic |
|---|---|---|
| Bulk acrylic removal | Carbide barrel | Coarse cutting |
| Hard-gel reduction | Carbide or ceramic | Product-focused removal |
| Gel product reduction | Carbide or ceramic | Medium/coarse depending on product |
| Detailed refinement | Diamond | Controlled abrasive action |
| Cuticle-area detail | Fine diamond | Precision work |
| Sidewall detail | Flame/tapered diamond | Narrow access |
| Surface smoothing | Fine abrasive/diamond | Finishing |
| Pedicure detail | Appropriate diamond/rounded bit | Depends on service |
| Finishing | Fine/super-fine bit | Gentle refinement |
| Disposable abrasive work | Mandrel + sanding band | Single-use abrasive |
This table is a general reference, not a substitute for training or the manufacturer's instructions.
Which Nail Drill Bit Should I Use for Gel Polish?
For gel polish, the correct bit depends on whether you are removing the product, refining it or performing another stage of the service.
For removing substantial product, technicians commonly use an appropriate carbide or ceramic bit.
As the product becomes thinner, control becomes increasingly important.
The biggest mistake is continuing aggressive filing after the artificial product has nearly disappeared.
The natural nail underneath is a different surface and requires a different approach.
Which Nail Drill Bit Should I Use for Acrylic?
Acrylic is relatively hard compared with many nail coatings, so carbide bits are commonly used for efficient reduction.
A coarse or medium carbide bit can be useful during bulk removal, while a finer bit can be used for refinement.
The exact choice depends on:
Thickness of the acrylic
Amount of product being removed
Shape of the enhancement
Stage of the service
Technician's experience
The objective should not simply be “remove acrylic as fast as possible.”
Controlled reduction is more important than maximum speed.
Which Nail Drill Bit Should I Use for Builder Gel?
Builder gel can vary considerably in hardness and formulation.
For significant product reduction, a suitable carbide or ceramic bit may be appropriate.
For refinement, technicians may switch to a finer bit.
Always consider the manufacturer's instructions for the particular product.
There is no single “builder gel bit” that works identically for every formulation.
Can You Use a Nail Drill on Natural Nails?
Yes, e-files can be used as part of professional natural-nail services but natural nails require considerably more care than artificial product.
Natural nail tissue can be thinned or damaged by excessive filing.
The important variables include:
Bit selection
Bit condition
Speed
Pressure
Contact time
Movement
Angle
Technician training
Professional safety guidance emphasizes that an e-file is a system rather than simply a motor running at a particular RPM.
If you are inexperienced, learning on artificial practice material under proper instruction is safer than experimenting aggressively on your own natural nails.
Nail Drill Bits and RPM
RPM means revolutions per minute.
It describes how quickly the bit rotates.
A higher RPM does not automatically mean better or faster work.
The appropriate speed depends on:
Bit type
Bit diameter
Material being removed
Technique
Pressure
Location on the nail
Experience
Manufacturers may specify recommended operating ranges for individual bits.
Instead of thinking:
“Higher RPM means faster service.”
Think:
“The correct combination of speed, bit and technique produces controlled work.”
Excessive speed combined with pressure can create unwanted heat and increase the risk of damaging the nail.
Why Does a Nail Drill Get Hot?
Heat can build up through friction.
Common causes include:
Excessive pressure
Holding the bit in one location
Using an unsuitable bit
Working at an inappropriate speed
Using a worn bit
Trying to remove too much material in one pass
If the client reports heat or discomfort, stop and reassess.
Do not simply increase speed to try to finish the job.
Never Stay in One Place Too Long
An e-file bit is rotating continuously.
If you hold it in one spot, friction and heat can build up quickly.
Controlled movement is therefore a fundamental part of e-file technique.
This is particularly important when working near the natural nail.
Pressure: Let the Bit Do the Work
One of the most common beginner mistakes is pressing harder because the bit does not seem to be removing material quickly enough.
More pressure is not necessarily the solution.
If removal is inefficient, consider:
Whether the bit is appropriate
Whether the bit is worn
Whether the grit/cut is appropriate
Whether the speed is suitable
Whether the technique needs improvement
A properly selected bit should do the majority of the cutting or abrasive work.
Nail Drill Direction: Forward and Reverse
Many professional e-files allow the user to select forward or reverse rotation.
Direction can matter because the cutting structure of some bits is designed around a particular direction and hand position.
Some manufacturers specifically offer reverse-cut carbide bits for users who need to work in reverse rotation.
Do not randomly switch direction while the bit is running.
Always follow the bit manufacturer's instructions and learn correct directional technique through hands-on training.
Nail Drill Bits for Beginners
If you are new to e-files, you do not need a collection of dozens of bits.
A small, purposeful set is usually easier to understand.
A basic training collection might include:
A suitable medium/fine diamond bit
A safety style bit for appropriate product work
A suitable carbide or ceramic removal bit
A fine finishing bit
A mandrel with appropriate sanding bands
The exact set should depend on the services you perform.
Buying 30 different shapes before learning what each one does usually creates confusion rather than skill.
How to Choose Nail Drill Bits
Before buying a bit, ask five questions.
1. What material will I be working on?
Natural nail?
Gel?
Builder gel?
Hard gel?
Acrylic?
Skin?
Different materials require different approaches.
2. How much material needs to be removed?
Heavy product reduction requires a different tool from final refinement.
3. How much precision do I need?
A broad barrel is useful for larger areas.
A narrow flame or cone can reach smaller areas.
4. What is my experience level?
A highly aggressive bit can be unforgiving in inexperienced hands.
5. What does the manufacturer recommend?
Bit manufacturers may provide instructions about compatible materials, direction, speed and cleaning.
Those instructions should take priority over generic internet charts.
Common Nail Drill Bit Mistakes
Using One Bit for Everything
There is no reason to expect one bit to perform every job equally well.
A removal bit, cuticle-detail bit and polishing bit have different purposes.
Using a Coarse Bit on the Natural Nail
Coarse bits are designed for aggressive material removal.
Using them carelessly on the natural nail can cause thinning and damage.
Applying Too Much Pressure
If the bit is not performing properly, pressing harder can increase friction and heat rather than solving the underlying problem.
Working Too Slowly in One Spot
Slow movement or stopping can concentrate heat in a small area.
Using a Damaged Bit
Inspect bits before use.
Do not use bits that are:
Cracked
Bent
Damaged
Heavily worn
Loose
Otherwise compromised
A damaged bit can vibrate unpredictably and affect control.
Ignoring the Manufacturer's Instructions
A color band, shape or material name does not tell you everything.
The manufacturer's instructions can contain important information about the particular product.
How to Clean Nail Drill Bits
Cleaning is not optional in a professional nail environment.
After use, reusable bits should be cleaned and disinfected according to applicable regulations and the disinfectant manufacturer's instructions.
The general process may involve:
Removing visible debris
Cleaning the bit
Using the appropriate disinfectant
Following the required contact time
Rinsing if required
Drying thoroughly
Storing the cleaned and disinfected bit appropriately
OSHA guidance for nail salons emphasizes cleaning and disinfecting reusable tools according to applicable state cosmetology requirements and the disinfectant manufacturer's directions.
Do not assume that simply spraying a bit or placing it in a UV box makes it sterile.
Disinfection, sanitization and sterilization are not interchangeable terms.
Where local regulations require sterilization for particular reusable instruments, follow those requirements and use equipment appropriate for the instrument and procedure.
What About Sanding Bands?
Disposable sanding bands can provide a practical hygiene advantage because the abrasive sleeve can be discarded after use.
However, the reusable mandrel still requires appropriate cleaning and disinfection.
Never assume that a disposable sanding band makes the entire tool disposable.
How Long Do Nail Drill Bits Last?
There is no single lifespan for every bit.
Longevity depends on:
Material
Frequency of use
Type of product removed
Cleaning process
Disinfection process
Storage
Quality
Amount of wear
A worn bit may require more pressure to accomplish the same work.
That can make the service slower and potentially increase heat and discomfort.
Replacing a worn bit is therefore part of maintaining consistent performance.
Carbide vs Ceramic vs Diamond Nail Drill Bits
| Feature | Carbide | Ceramic | Diamond |
|---|---|---|---|
| Typical action | Cutting | Cutting/abrasive depending on design | Abrasive |
| Common use | Product removal | Product removal/refinement | Detail and finishing |
| Acrylic | Excellent for appropriate bits | Suitable for appropriate bits | Refinement |
| Hard gel | Common choice | Common choice | Detail/refinement |
| Cuticle-area work | Usually not the first choice | Depends on design | Commonly used in trained techniques |
| Available shapes | Many | Many | Very many |
| Best strength | Efficient product reduction | Product work and heat characteristics | Precision/detail |
This is a broad comparison. Individual bits can behave differently depending on their construction.
How to Store Nail Drill Bits
After cleaning and drying, store bits in a clean, protected environment.
Avoid throwing different bits loosely into a drawer where their working surfaces can strike each other.
Good organization also makes it easier to identify:
Material
Shape
Grit
Condition
Intended use
A simple labeled storage system can save considerable time during a busy service.
A Simple Nail Drill Bit Buying Guide
If you are purchasing your first set, concentrate on versatility rather than quantity.
For product removal
Look for appropriate carbide or ceramic bits.
For detail work
Look at fine diamond shapes such as flame or other precision profiles.
For surface refinement
Choose an appropriate fine or medium bit.
For disposable abrasive work
Consider a mandrel with sanding bands in different grits.
For finishing
Keep at least one fine finishing/polishing option appropriate to your service.
The goal is to build a collection around your actual work rather than buying every shape available.
Are Expensive Nail Drill Bits Better?
Not necessarily but Price can reflect:
Material quality, Manufacturing precision, Coating quality, Durability, Brand, Quality control, Design.
But an expensive bit in the wrong shape or grit is still the wrong bit.
A properly selected, well-maintained bit that matches the task is more useful than an expensive bit that does not.
Nail Drill Bit Safety Checklist
Before using an e-file, check:
Is the bit compatible with the handpiece?
Is the bit clean?
Is the bit undamaged?
Is the shank secure?
Is the selected bit suitable for the material?
Is the speed appropriate?
Is the direction correct?
Am I applying unnecessary pressure?
Am I keeping the bit moving?
Can I see the working area clearly?
Is dust being controlled appropriately?
Am I following local hygiene requirements?
If something feels wrong, especially heat, pain, excessive vibration or loss of control, stop.
Nail Dust and Ventilation
Filing artificial nail products creates dust.
Good workplace practice includes appropriate ventilation and local dust extraction where possible.
Dust control is especially important for professionals who perform filing repeatedly throughout the working day.
Appropriate respiratory protection may also be required depending on the workplace, products and applicable occupational-health guidance.
Nail Drill Bits FAQ
What is the best nail drill bit for beginners?
There is no single best bit for every beginner.
A sensible starting collection usually includes a few moderate, versatile bits rather than highly aggressive specialist bits. A fine or medium diamond bit, an appropriate safety-style product bit and a suitable sanding band setup can cover many learning situations.
Hands-on training is more important than owning a large collection.
What nail drill bit removes acrylic?
Carbide bits are widely used for acrylic reduction because their cutting flutes can remove artificial product efficiently.
Ceramic bits are also used for appropriate product removal applications.
The correct grit/cut depends on how much product needs to be removed.
What nail drill bit removes gel?
Appropriate carbide or ceramic bits are commonly used for gel product removal and reduction.
The exact choice depends on the type and thickness of the gel.
What is a diamond nail drill bit used for?
Diamond bits are commonly used for precision and abrasive work, including certain natural nail preparation, detail and finishing applications.
Their shape and coarseness determine the specific job.
What do the colors on nail drill bits mean?
The colored band often indicates coarseness, but the color system is not guaranteed to be identical between manufacturers.
Always check the product specifications.
Is a coarse nail drill bit better?
Not necessarily.
A coarse bit removes material more aggressively, which is useful for some product removal tasks. It is not automatically better for finishing or delicate work.
Can I use a carbide bit on natural nails?
The answer depends on the specific bit, technique and application, but beginners should not assume that an aggressive product removal carbide bit is appropriate for the natural nail.
Natural nail work requires controlled technique and proper training.
Can nail drill bits be reused?
Many professional metal drill bits are reusable when they are designed for reuse and can be properly cleaned and disinfected according to applicable requirements.
Disposable sanding bands are intended to be discarded rather than reused.
How often should nail drill bits be replaced?
Replace a bit when it becomes excessively worn, damaged or no longer performs properly.
There is no universal number of services that applies to every bit.
Why does my nail drill bit hurt?
Pain or heat can result from excessive pressure, prolonged contact, inappropriate speed, an unsuitable bit or poor technique.
Stop immediately if the client experiences pain or excessive heat and reassess the procedure.
Should beginners use a nail drill on natural nails?
Beginners should be cautious.
Natural nails are not the same as artificial product and an efile can remove natural nail material very quickly when used incorrectly.
Proper hands-on education is strongly recommended before attempting advanced efile techniques.
Final Thoughts
Understanding the Bit Matters More Than Owning More Bits
Nail drill bits can look complicated when you first encounter them, but the system becomes much easier once you separate the three main variables:
Material + Shape + Coarseness = Function
Carbide and ceramic bits are commonly associated with product reduction and removal. Diamond bits are widely used for precision and abrasive work. Barrel, flame, cone, ball and other shapes provide different levels of access and control.
The most important lesson is not to search for one “best” nail drill bit.
Instead, learn to ask:
What am I working on?
How much material needs to be removed?
Where am I working?
How much control do I need?
What does the manufacturer recommend?
Once you understand those questions, choosing a nail drill bit becomes much less confusing.
And remember, an e-file is a precision tool. Speed, pressure, movement, bit condition, hygiene and training all matter. The objective should always be controlled, comfortable and safe work not simply removing product as quickly as possible.